


We will be sharing a STEM challenge children can do at home here every week. Complete the challenge and share your results on social media with @BramptonLibrary #kidsatBL!
This week’s challenge:
This week, we will learn about buoyancy and water displacement, by designing, building, and testing our own boats!
Supplies you will need:
- Ruler
- Scissors
- Tape
- Tinfoil square- approx 30cm x 30cm
- Weights (i.e. small rocks)
- Plastic straws
- Popsicle sticks
- A tub, sink, or bucket full of water, to test your boat!
How does a boat float?
There are three key concepts we need to understand, to learn how a boat floats:
- Water displacement. When something is placed in the water, it will either float or sink. What happens to the water, though? The item in the water will push the water aside; this is called displacement.
- Buoyancy. How do we know what will float and what will sink? Usually, heavy things sink and light things float, but other factors can be at work. For instance, a paperclip is lighter than an apple, but a paperclip will sink while an apple will float because an apple contains more air. As long as the weight of the object being placed in the water is less than the weight of the water displaced, the object will float.
- Surface area. The wider surface area an object has, the greater chance it will float and the more weight it will hold.
Building your boat
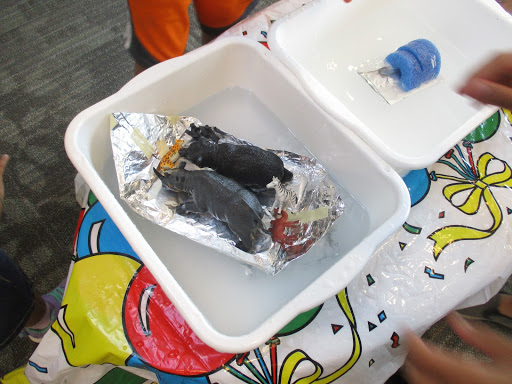
- Using a square of tin foil, straws, popsicle sticks and tape, construct a boat that can carry weight in the water!
- Think about different types of boats you have seen: canoes, kayaks, barges, yachts, etc. What type of boat are you going to build?
- Make sure your boat has space to carry weight!
- Remember to consider how water displacement, buoyancy, and surface area work in allowing your boat to float.
Test your boat!
- Fill a tub/bath/sink with water, and put your boat in the water. Does it float?
- No: why not? Are there any holes in your boat? Try fixing it, or build another one!
- Yes: good job! Now, it’s time to add weight.
- Add weights- magnets, washers, small pebbles- one at a time. How many weights can your boat carry before it sinks?
Need to try again?
- If you’re not happy with how much weight your boat can carry- try again!
- Engineers are always working to improve their designs even once their product is on the market, so continuing to tinker and figure out what works best.
- Build another boat, and remember to consider how water displacement, buoyancy, and your boat’s surface area work together to keep the boat floating. Would a wider base (more surface area) help it float? Would borders around the side make a difference? How can you use popsicle sticks or straws to support the structure?
Want to try something different? Why not see how well your boat floats in salt water, or in vegetable oil? Does the liquid make a difference in displacement and buoyancy? Make sure to ask a grown-up for help first!
And don’t forget to share your creations with us, @BramptonLibrary #kidsatBL!
If you liked this activity, you might enjoy these free resources from our digital library:
Stem Lab by Jack Challoner and the Smithsonian Institution (non-fiction book/eBook, recommended for 8-12 years)

STEAM Lab for Kids 52 Creative Hands-On Projects for Exploring Science, Technology, Engineering, Art, and Math by Liz Lee Heinecke

STEM Village: Introduction to Buoyancy (electronic resource, recommended for 10-12 years)
Resources for grown-ups:
 905-793-4636